

The previous article described how to use ready-made stock vector images for lasercutting work, but sometimes (depending on how the artist created the original image) it can still take several hours of ‘tweaking’ to make them suitable for your own project.
What if you already know the sort of design you want, and could draw it quickly by hand but you’re stuck with using a mouse or trackpad that doesn’t quite do the job? This article will show a quick way to create hand-drawn vector images for your lasercutting projects, that you know will be exactly right for your work because you created them. Plus they’re original and you don’t need to pay anyone for the rights to use them!
You will need:
- White paper
- Thick black pen (e.g. a Sharpie, or I just get cheap markers from Wilko)
- Drawing software (e.g. I use CorelDraw, or you could use Illustrator or others)
Step 1: Use the thick black pen to draw your designs.

Step 2: Scan or photograph your hand-drawn image, and save it somewhere that you’ll be able to retrieve it from your drawing application.
Step 3: Open your drawing software and import the image (in CorelDraw use Ctrl + I, and in Illustrator I think it’s File > Place)
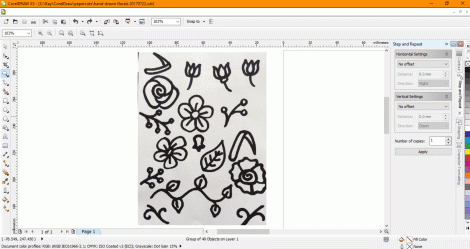
Step 4: Now you basically need to get the software to turn your photo (millions of pixels) into vectors (hundreds of coordinates), so you’ll be able to create a design that your laser can cut. In CorelDraw you can do this by selecting the image and then go to Bitmaps > Quick Trace. (In Illustrator it’s called Live Trace.) The software then simplifies blocks of colour and turns them into separate objects:

Step 5: (Optional) The software doesn’t always get the conversion exactly right, so you might end up with an object made up of a couple of layers of colour (in the case below, there is a solid black flower outline, with some grey petal shapes on top of it, instead of being made of thin black outlines). In CorelDraw it’s easy to ungroup the object (Ctrl + U), and then highlight the group of object (e.g. the flower in this case) and go into Arrange > Shaping > Back Minus Front.


Step 6: (Optional) If you want, you can copy shapes and/or move or re-size them until you have the design that you want.

Step 7: If you want to cut the shapes then make sure they have a thin or hairline-width outline, but if you just want to etch the shapes then they don’t need the thin outline:

Step 8: (Optional) If you have combined several shapes in one design, you may need to ‘weld’ them together before you cut them. The laser cutter will cut anything that has a thin outline, and so in the example above, the three flowers would be cut out separately. To make sure the laser sees all of the flowers as one design and not as individual objects to cut out, you can use the ‘weld’ function (in CorelDraw it’s Arrange > Shaping > Weld.)

The design should now cut properly.
